# Interactive views
This tutorial will guide you through adding interactive HTML views to Substrate documents. These views are quite handy to display live, visual examples of the code contained in a document and/or imported from others.
We'll also cover some notions of code architecture that are not necessarily Substrate-specific. Bear in mind that the approaches presented here, though well suited for leveraging Substrate's features, are just a few of the many possible.
# Create an explorable block
Create a folder for this project, interactive-views.
Inside of it, create a new Substrate document, index.explorable.md, with the following content :
# Interactive views

```js explorable

console.log("I am a JavaScript explorable block. My code is hidden by default and only executes in this document!")

```
This defines a JavaScript explorable block.
If you take a look at this document in the viewer, you will notice that the block's code is hidden by default, as a collapsible. That's one distinctive feature of explorable blocks. Nevertheless, "I am a Javascript explorable block... is logged to the console, meaning the code executes.
However, if you try importing index.explorable.md in another document, and view that document, you won't see anything logging to the console. That's because the code contained in explorable blocks is excluded from a document's output - it will only ever execute when viewing that particular document.
This makes explorable blocks perfectly suited for code examples that should have no incidence outside of a document.
That's great, but how will the result of these examples show up, besides console logs and shabby alert() pop-ups?
Enter the third distinctive feature of explorable blocks, and not the least: HTML views. Indeed, these blocks can contain a definition for an arbitrary HTML structure that will get rendered right above them. It is then possible to factor JavaScript code and user input into these views.
Let's try it, shall we?
# Add an HTML view
Edit index.explorable.md like so:
# Interactive views

```js explorable
html`<div>
    <h3>hello</h3>
</div>`
```

## Imports

```js
import html from 'https://cdn.skypack.dev/snabby'
```
Two things happen here:
import html from 'https://cdn.skypack.dev/snabby'imports an external dependency, Snabby (opens new window)**, through Skypack (opens new window). Snabby is required to define HTML views in Substrate documents.html`...`invokes Snabby's tag function to create a Snabbdom (opens new window) virtual node as a template string. Because this is the last statement in the block, Substrate will insert an HTML view with this content in the viewer, just above the block's code.
Snabby has to be imported as html for views to be inserted. The html call also has to sit at the very end of an explorable block.
Furthermore, it's worth noting that explorable blocks with a view (ending with `html...`) can't contain import statements. When that happens, an error is thrown and neither the view nor the imports work.
In the viewer, 'hello' should show up.
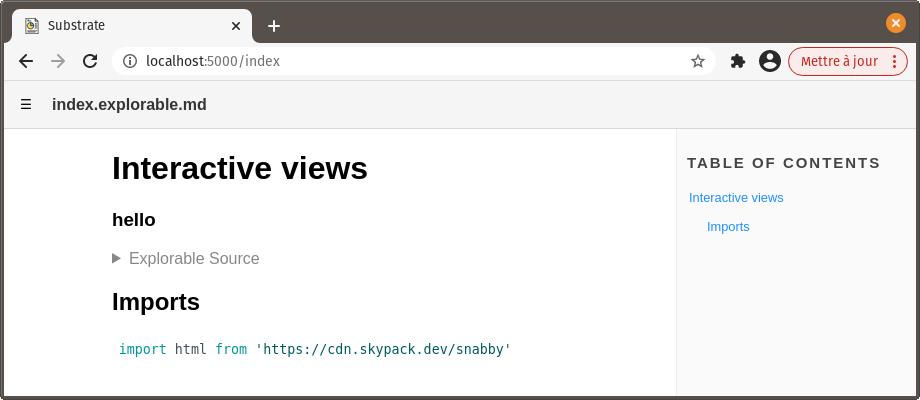
That's our view - arbitrary HTML rendered directly in our document's visualization!
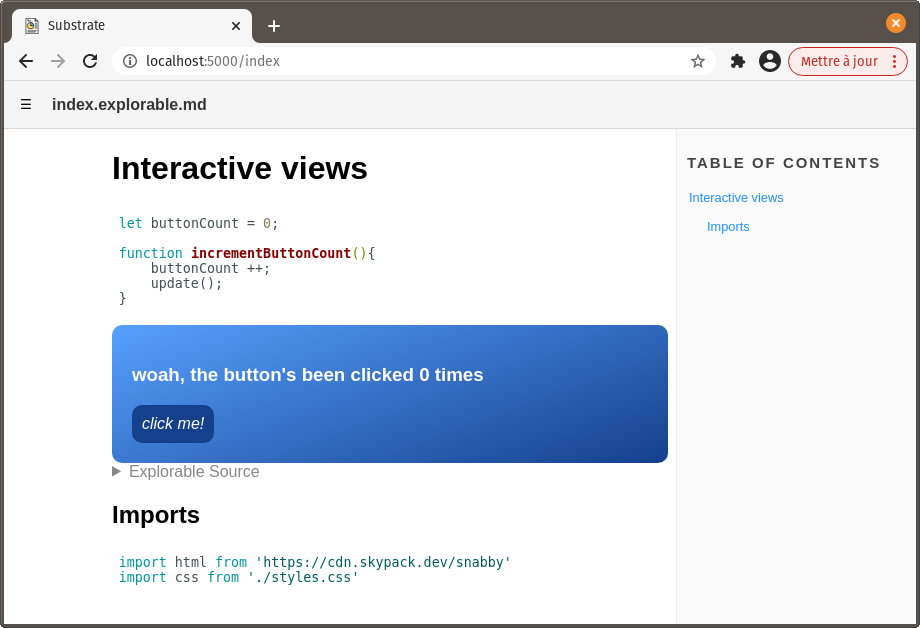
# Make it interactive
Now let's infuse some interactivity into this view. Wouldn't it be great if a button changed the displayed text when clicked? Yes, yes it would.
In index.explorable.md, add a JavaScript block with the following content:
```js
let buttonCount = 0;

function incrementButtonCount(){
    buttonCount ++;
}
```
buttonCount will hold the number of times a button has been clicked, and incrementButtonCount() will increment buttonCount when called.
Then, edit the view's template string like so:
```js explorable
html`<div>
    <h3>woah, the button's been clicked ${buttonCount} times</h3>
    <button @on:click=${incrementButtonCount}>click me!</button>
</div>`
```
${buttonCount}embeds the value ofbuttonCountin our<h3>'s displayed text content.<button...>is a button element added to the view.@on:click=${incrementButtonCount}is a Snabby directive. It interacts with Snabbdom's eventListeners module to haveincrementButtonCount()called whenever this button is clicked. LikebuttonCount,incrementButtonCountis embedded into the template string by wrapping it in${...}.
This template string isn't directly appended to the DOM. Instead, it's a template for a virtual node (or vnode) - sort of a model for a desired DOM state that is initially used to insert corresponding elements in the DOM. When some change occurs in that model, the new version is compared with the previous one to update the DOM efficiently.
When updating our view, Snabby will recalculate the model from the template, factoring in the current value of everything embedded with ${...}.
So, changing the value of buttonCount will suffice to change our <h3>'s displayed content. Will it?
# Refreshing the view
There's actually just one thing missing. We need to tell the view to refresh after buttonCount changes.
To achieve this, simply add update() at the end of incrementButtonCount:
function incrementButtonCount(){
    buttonCount ++;
    update();
}
update() is a global function defined by Substrate that calls Snabby's own update() function to update the DOM in all views.
It's important to consider that update() also causes the JavaScript code in the views' block to re-execute. If we had defined buttonCount and incrementButtonCount() in the same block as our view, buttonCount would have reset to 0 on every refresh, and incrementButtonCount() would have been uselessly recreated over and over again.
Hopefully, we didn't do that. Phew!

# Style it with CSS
Let's make this view more interesting.
In the project's folder, create a new CSS file, styles.css.
Add some content to it:
div {
    padding: 20px;
    border-radius: 10px;
    background: linear-gradient(160deg, rgb(86 160 255) 0%, rgb(21, 64, 139) 100%);
    color: white;
}

button {
    padding: 10px;
    border: none;
    border-radius: 10px;
    background: rgb(21, 64, 139);
    color: white;
    font-size: 1em;
    font-style: italic;
}

button:active {
    background: rgb(86 160 255);
    color: rgb(21, 64, 139);
}
Back to index.explorable.md, add this line to the first JavaScript block - the one containing the import statement for Snabby.
import css from './styles.css'
Substrate turns ./styles.css into a JavaScript module that exports a string. (See styling interactive views)
To apply the imported styles to the html view, add a <style> tag in the view's div:
```js explorable
html`<div>
    <style>${css}</style>
    <h3>hello</h3>
</div>`
```
That's better!
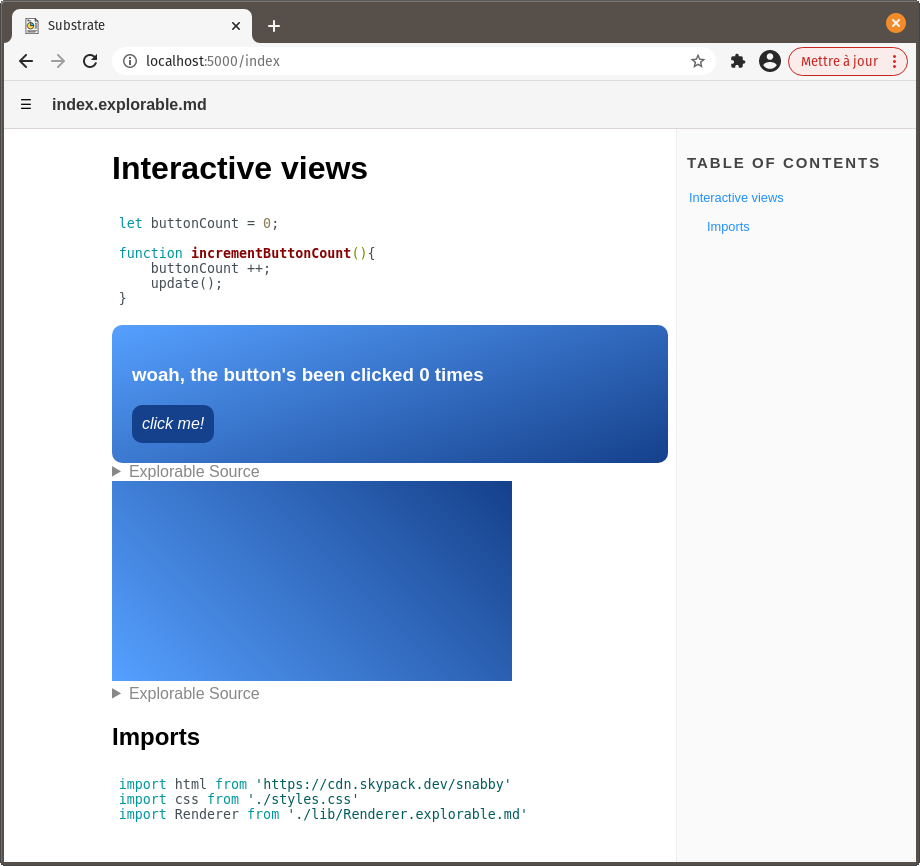
# Insert a canvas element
While it's awesome to be able to embed a DOM structure into a document and interact with it, some code is meant to ultimately draw things to the screen in more of a freestyle fashion - as is the case in most videogames, for example. That's what the canvas element is for.
It's as easy to add a canvas to a view as any other HTML element. But, in order to keep things nice and clean, let's have information for rendering to the canvas stored in a separate file. That will be useful later on.
In your project folder, create a subfolder, lib, where all local dependencies of index.explorable.md will go.
Inside of lib, create Renderer.explorable.md with the following content:
```js
const Renderer = {
    width: 400,
    height: 200,
    ctx: null
}

export default Renderer
```
Back to index.explorable.md, add this explorable block below the existing one:
```js explorable
html`<canvas width="${Renderer.width}"
    height="${Renderer.height}"
    style="background: linear-gradient(45deg, rgb(86 160 255) 0%, rgb(21, 64, 139) 100%)">
</canvas>`
```
Of course, we could have styled the canvas with CSS instead of inlining it.
Finally, add the import statement for Renderer alongside the other imports:
import Renderer from './lib/Renderer.explorable.md'
There you go! The newer html view contains a blank canvas ready to be drawn onto:
# Draw to the canvas
First, we need to get a reference to its drawing context. This can be done handily by taking advantage of Snabbdom hooks.
Add @hook:insert=${_insertHook} to the canvas-related html view, as an attribute:
html`<canvas width="${Renderer.width}"
    height="${Renderer.height}"
    @hook:insert=${_insertHook}
    style="background: linear-gradient(45deg, rgb(86 160 255) 0%, rgb(21, 64, 139) 100%)">
</canvas>`
@hook:insert=${_insertHook} is another of Snabby's directives. It interacts with Snabbdom's hooks module to have _insertHook() called when the canvas element corresponding to this virtual node is inserted into the DOM. A reference to the virtual node will be passed to _insertHook().
From there, it's simple to grab a reference to the canvas element's drawing context through the vnode's elm property. In the topmost JavaScript block, after incrementButtonCount(), add the definition for _insertHook().
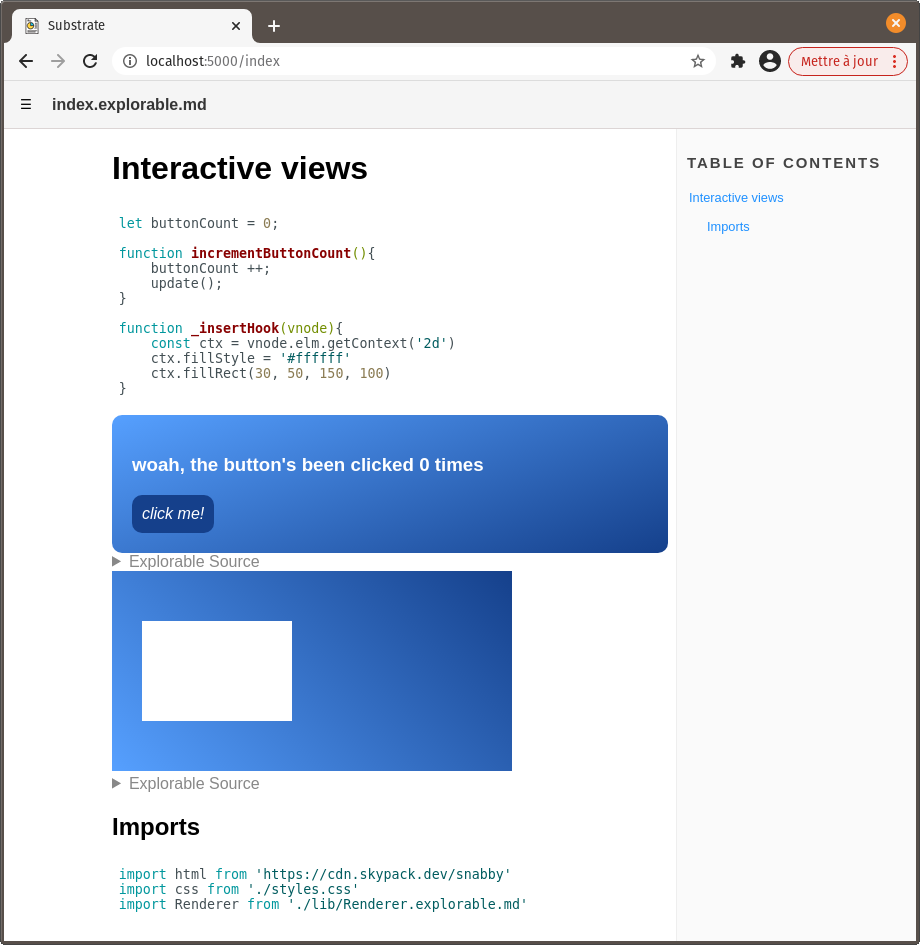
function _insertHook(vnode){
    const ctx = vnode.elm.getContext('2d')
    ctx.fillStyle = '#ffffff'
    ctx.fillRect(30, 50, 150, 100)
}
In addition to getting the drawing context, we use it immediately to draw a white rectangle.
# Setup an animation loop
While drawing to the canvas can now be done anywhere in the code, a common approach is to implement a loop to update and redraw things every frame.
We won't be drawing to the canvas in _insertHook() anymore. We'll also need our Renderer object to hold a reference to the drawing context. Re-write _insertHook like so:
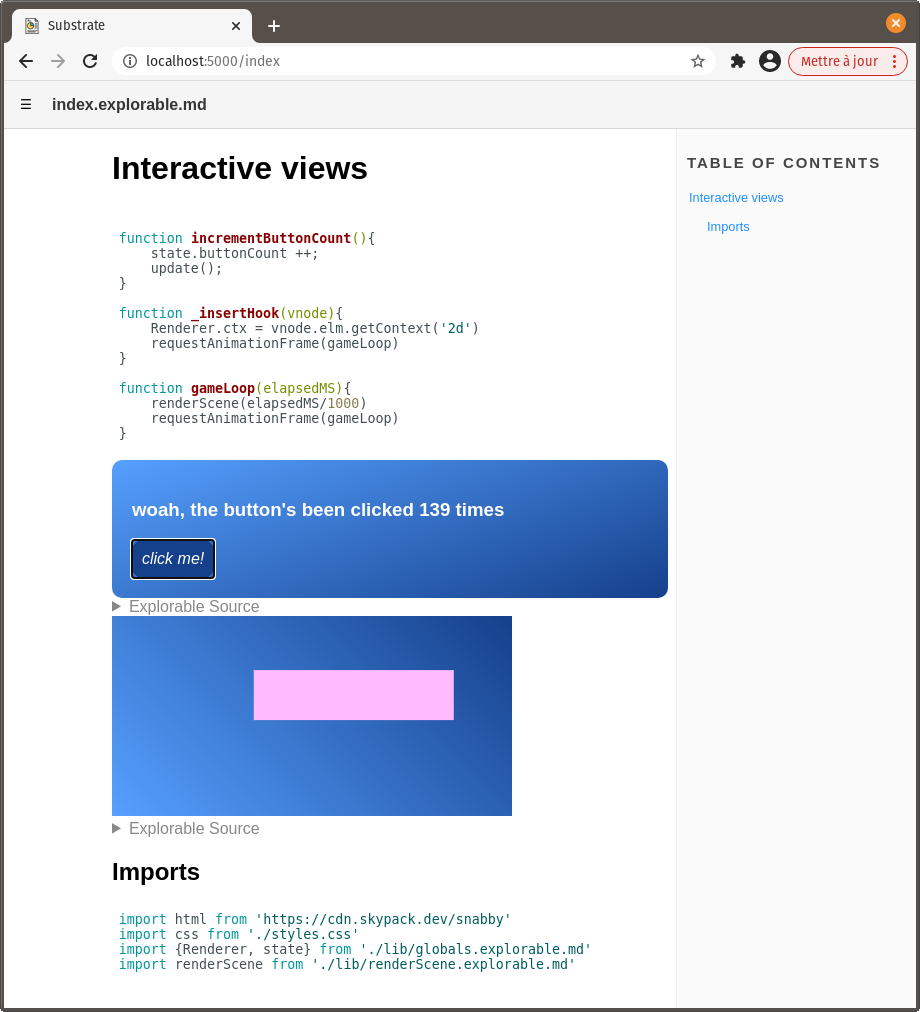
function _insertHook(vnode){
    Renderer.ctx = vnode.elm.getContext('2d')
    requestAnimationFrame(gameLoop)
}
And just below it, add the definition for gameLoop():
function gameLoop(elapsedMS){
    renderScene(elapsedMS/1000)
    requestAnimationFrame(gameLoop)
}
Called as a result of requestAnimationFrame(), gameLoop() will be passed the webpage's elapsed time since loading.
That information will be passed to a local dependency, renderScene(), where the drawing action will happen. In the lib subfolder, create renderScene.explorable.md with the following content:
```js
export default function renderScene(elapsedSecs){

    Renderer.ctx.clearRect(0, 0, Renderer.width, Renderer.height)

    Renderer.ctx.fillStyle = '#ffffff'
    Renderer.ctx.fillRect(
        20,                                     // x
        50 + 25 * Math.cos(elapsedSecs * 5),    // y
        150, 100                                // width, height
    )
}

import Renderer from './Renderer.explorable.md'
```
This function uses the elapsed time, as well as properties of Renderer - conveniently imported here - to draw a moving rectangle to the canvas.
Don't forget to add the import statement for renderScene in index.explorable.md:
import renderScene from './lib/renderScene.explorable.md'
That white rectangle should now be a moving one.
# Influence the canvas
Of course, what is rendered should often be affected by user input.
Let's have the button click count influence the drawn rectangle's position.
In renderScene.explorable.md, edit the call to Renderer.ctx.fillRect():
Renderer.ctx.fillRect(
    20 + buttonCount,                       // x
    50 + 25 * Math.cos(elapsedSecs * 5),    // y
    150, 100                                // width, height
)
Does that work? No, it doesn't. An error is thrown because buttonCount doesn't exist in the scope of this module. Oops!
A simple workaround would be to pass buttonCount to renderScene(). That would do it nicely.
However, in a lot of cases, rendering depends on a vast amount of information, all of which can't always be passed to the rendering function. A more interesting approach, then, is to put information describing the application's state in a module (or modules) so it can be imported whenever required.
In the lib subfolder, create a new document, globals.explorable.md, with the following content:
```js
const state = {
    buttonCount: 0
}

const Rect = {
    width: 200,
    height: 50,
    color: '#ffbbff',
    amplitudeX: 60,
    amplitudeY: 25,
    speedX: 1,
    speedY: 5
}

const Renderer = {
    width: 400,
    height: 200,
    ctx: null
}

export {Rect, state, Renderer}
```
Besides moving buttonCount here, this also defines Rect, an object for configuring the moving white rectangle.
It also makes sense to move Renderer here, instead of giving it its own file. You may now delete Renderer.explorable.md.
In index.explorable.md, change the import statement for Renderer accordingly:
import {Renderer, state} from './lib/globals.explorable.md'
This imports both Renderer and state from globals.explorable.md, as named imports.
Replace both occurences of buttonCount with state.buttonCount in this document:
function incrementButtonCount(){
    state.buttonCount ++;
    update();
}
html`<div>
    <style>${css}</style>
    <h3>woah, the button's been clicked ${state.buttonCount} times</h3>
    <button @on:click=${incrementButtonCount}>click me!</button>
</div>`
Finally, edit renderScene.explorable.md like so:
```js
export default function renderScene(elapsedSecs){

    Renderer.ctx.clearRect(0, 0, Renderer.width, Renderer.height)

    const rectXInCenter = Renderer.width/2 - Rect.width/2
    const rectYInCenter = Renderer.height/2 - Rect.height/2

    Renderer.ctx.fillStyle = Rect.color
    Renderer.ctx.fillRect(
        rectXInCenter + Rect.amplitudeX * Math.sin(state.buttonCount * Rect.speedX),    // x
        rectYInCenter + Rect.amplitudeY * Math.cos(elapsedSecs * Rect.speedY),          // y
        Rect.width, Rect.height                                                         // width, height
    )
}

import {Rect, Renderer, state} from './globals.explorable.md'
```
In addition to pointing correctly to imports and buttonCount, this function doesn't use hardcoded 'magic numbers' anymore to render the rectangle. Instead, it relies on properties of imported objects. This paves the way for more potential interactivity.
state.buttonCount is factored into the x component of the rectangle's drawing position, which was our objective. And through Rect's properties, we've changed the rectangle's color and size.
Because the views are updated efficiently - with the minimum required amount of disruption - our canvas element doesn't get re-created every time the button is clicked and update() is called. Good thing!
We could also add event listeners to the canvas to detect clicks, mouse position, key presses, etc. Pretty much anything that can be done on a regular webpage can be done here.
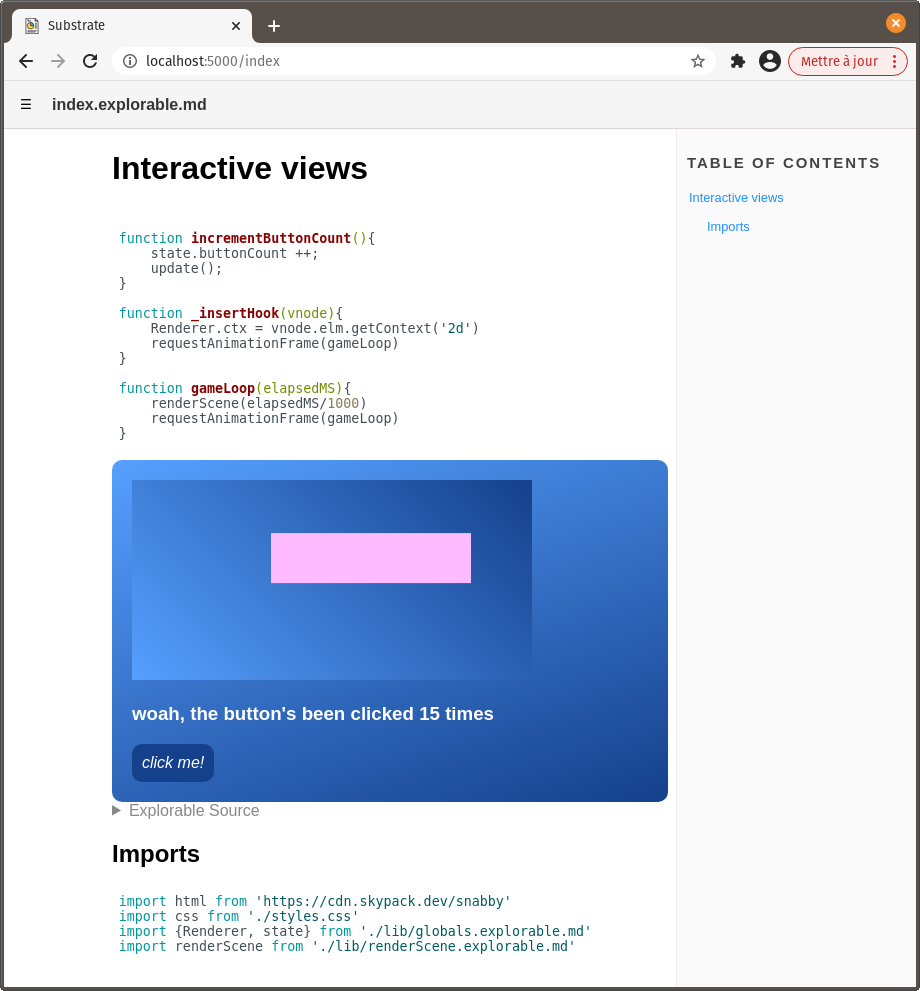
# Merge the views
HTML views don't have to contain either a canvas element or some other DOM structure. Both will coexist harmoniously, as long as there's exactly one top-level node containing the others.
In index.explorable.md, replace the two JavaScript explorable blocks with this one:
```js explorable
html`<div>
    <style>${css}</style>
    <canvas width="${Renderer.width}"
        height="${Renderer.height}"
        @hook:insert=${_insertHook}
        style="background: linear-gradient(45deg, rgb(86 160 255) 0%, rgb(21, 64, 139) 100%)">
    </canvas>
    <h3>woah, the button's been clicked ${state.buttonCount} times</h3>
    <button @on:click=${incrementButtonCount}>click me!</button>
</div>`
```
The result is what you'd expect: